Main interface#
Available controls are different for guests and users who are logged in.
Authorization#
Open the Web GIS and press “Sign in” in the top right corner.
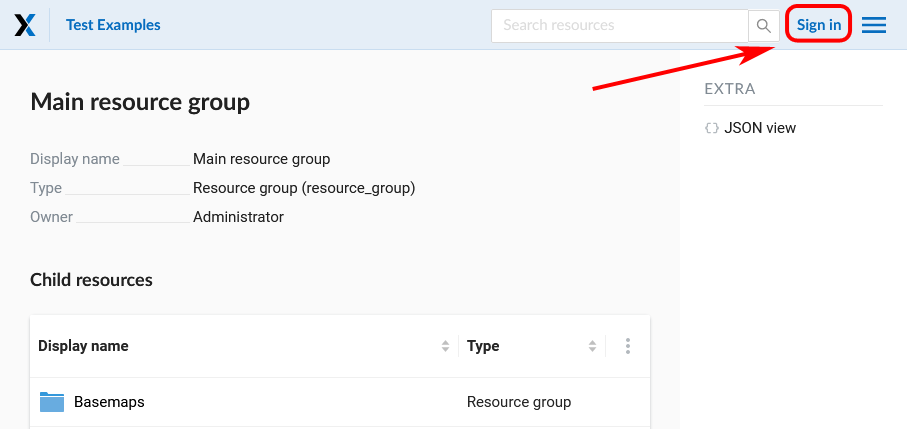
Fig. 244. Signing in from Web GIS main page#
In the opened dialog press the blue button that reads Sign in with NextGIS ID.
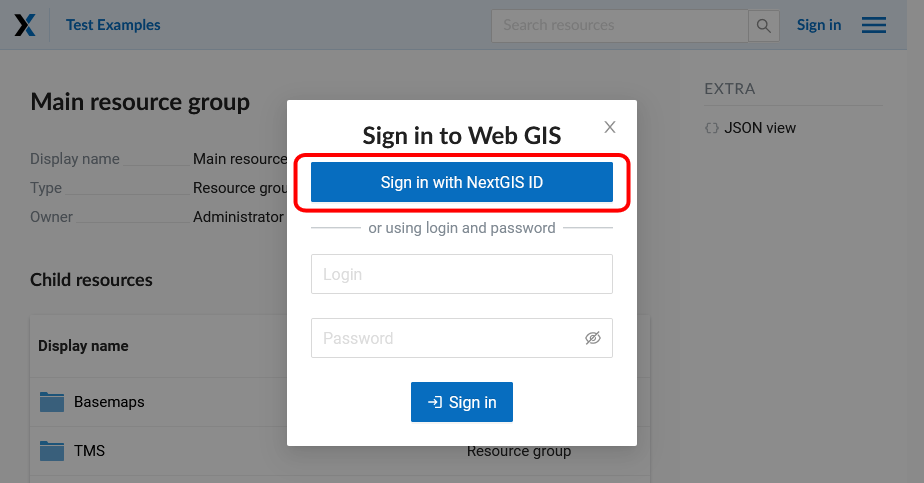
Fig. 245. Selecting sign-in via NextGIS#
You will be redirected to my.nextgis.com authorization page. Enter your username or email you used for registration, then on the next page enter your password.

Fig. 246. Signing in with NextGIS#
After the authorization is completed successfully you will be redirected back to the Web GIS.
Home page#
After login the user is taken to the home page shown on Fig. 247.
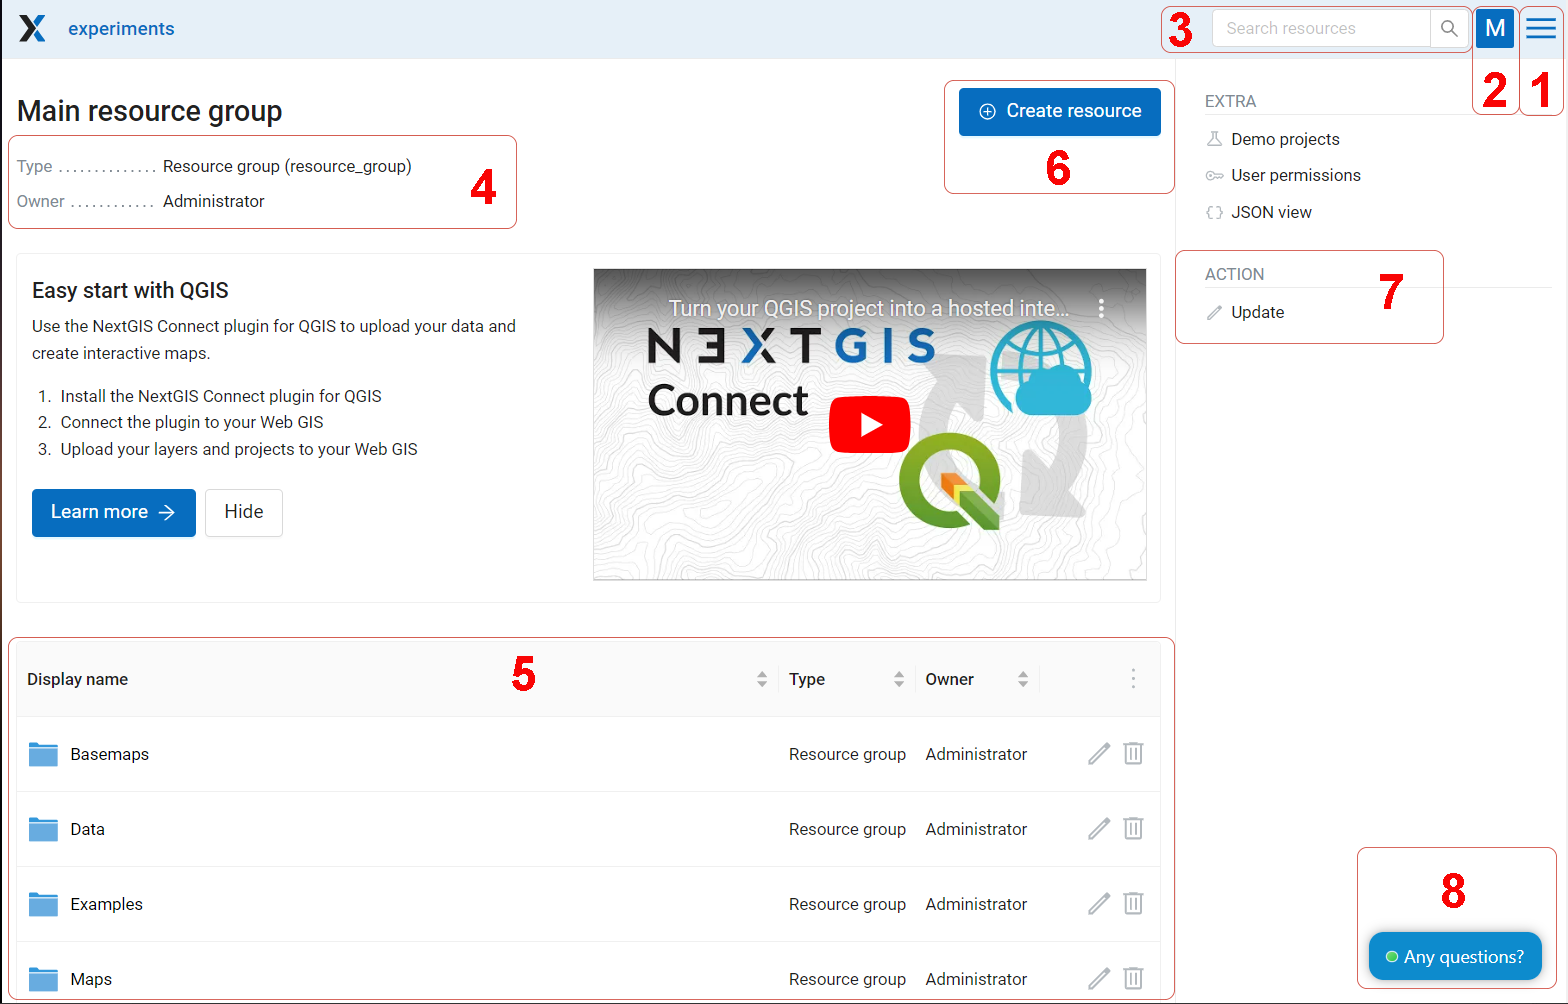
Fig. 247. Home page#
The numbers indicate: 1 - Main menu; 2 - User settings (Exit and Change language); 3 - Resource search bar in Web GIS 4 – Main resource group description; 5 - Child resources; 6 - User permissions for main resource group; 7 - Types of items that could be added to the main resource group; 8 - Actions that could be performed with main resource group
Home page includes main menu pane, (see item 1 in Fig. 247.) which has the following links (see Fig. 248.):
Resources
Control Panel
Help
Account

Fig. 248. Main menu in NextGIS Web#
Description pane (see item 4 in Fig. 247.) displays type of resource and owner as well as description (if available).
Child resources pane (see item 5 in Fig. 247.) contains a list of all resources placed in a main group. The table contains name and type of the resource and action buttons (edit, delete, for some types of resources - preview, open the attribute table).
“Create resoruce” button opens a pop-up window where you can choose the type of resource you want to create.
In current version it is possible to add the following types of data to the Main resource group:
Basemap
Collector project
Lookup table
OGC API - Features service
PostGIS connection
PostGIS layer
Raster layer
Resource group
TMS connection
TMS layer
Trackers group
Vector layer
Web Map
WFS service
WMS connection
WMS layer
WMS service
Depending on your NGW version you may also add:
SVG marker library
3D model
3D scene
3D tileset
Actions pane (see item 7 in Fig. 247.) contains tools for adding data and executing operations with the current resource. For the Main resource group the only available operation is Update (i.e. edit).
On the main page there is also a block of extra links:
User permissions - show access rights for the logged in user. Learn more about user permissions;
JSON view.
Language change#
Any authorized user can switch the interface language. To do this, in the upper right corner on the user icon, go to the “Settings” section.
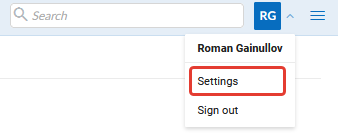
Fig. 249. Go to Settings bar#
The following languages are available for selection (Fig. 249.)
Default browser
Russian
English
Bulgarian
Chinese
Czech
French
German
Italian
Polish
Spanish
Portuguese
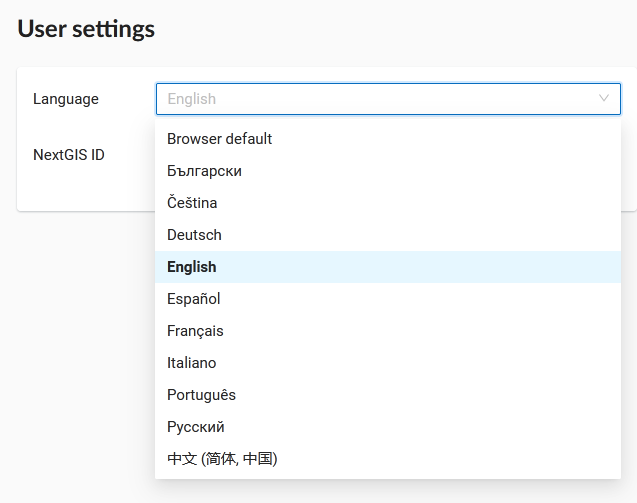
Fig. 250. Selecting language#
Resource search#
For easy search for resources and navigation, there is a search bar in the top bar (Fig. 251.). The search is carried out in the entire existing database, regardless of which directory the user is currently in.
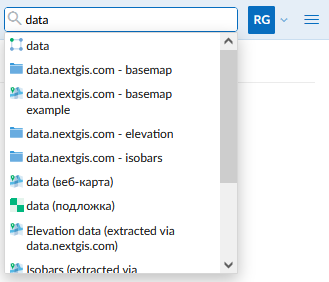
Fig. 251. Finding Resources in Web GIS#
See how the search works in our video:
Watch on youtube.
Advanced search with more parameters is activated by the  icon next to the search bar.
In advanced search mode you can search resources by:
Resource type - select one or multiple;
Owner - select one or multiple;
Root resource;
Name.
Pick the parameters and click Search.
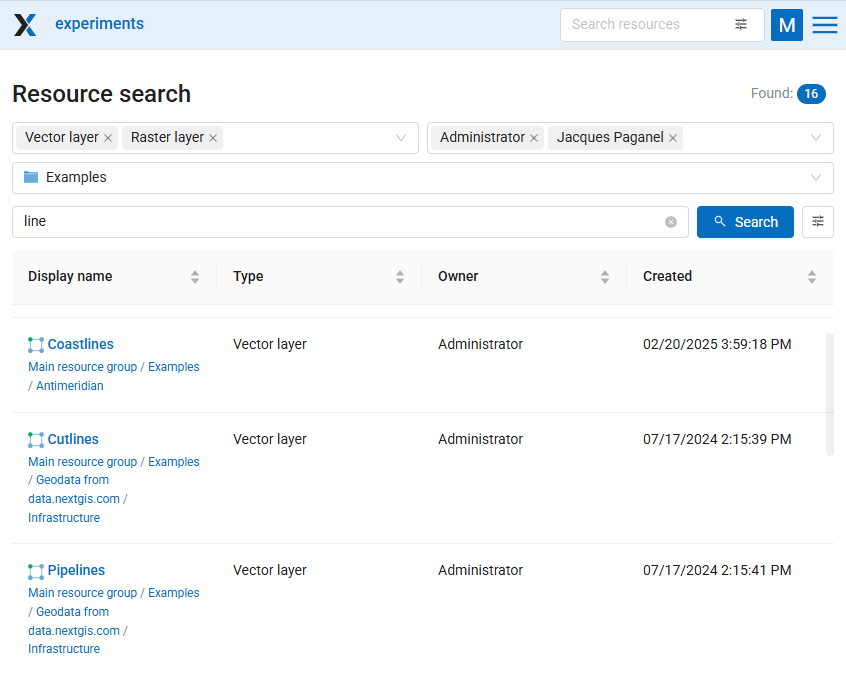
Fig. 252. Advanced search: vector and raster layers created by either Administrator or Jacques Paganel inside the Example resource group that have “line” in the name, 16 resources found#
Search results show the full path to the resource.
You can also search by metadata and technical key of the resource. To activate these search parameters, click next to the Search button.
To search by metadata, click and enter a key-value pair. You can add multiple metadata pairs.
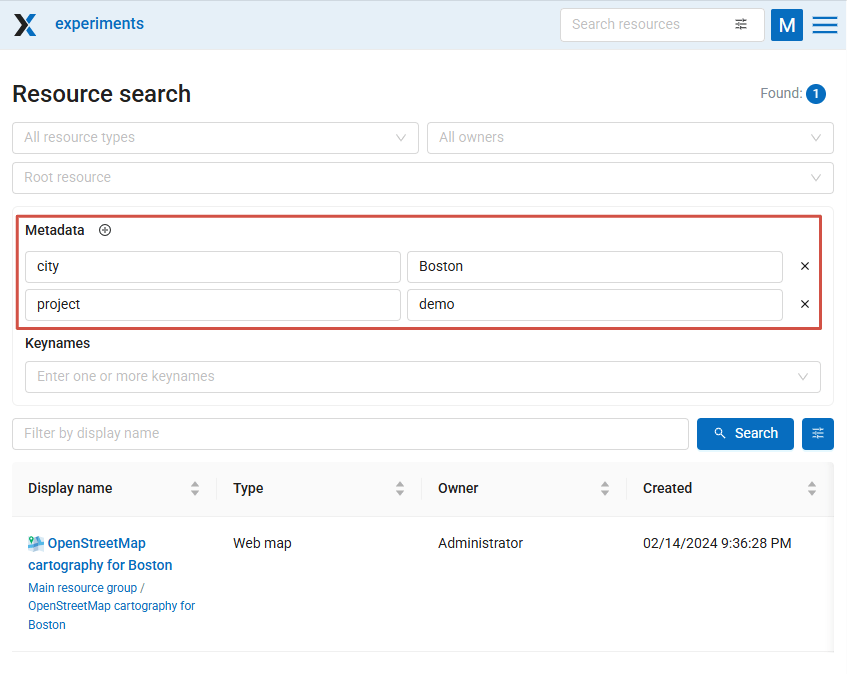
Fig. 253. Searching by metadata#
See how the advanced search works in our video:
Watch on youtube.
Control panel#
NextGIS Web Control panel is available through the main menu. Press the  button in the top right corner (see item 1 in Fig. 247.) and select “Control panel”.
Control panel has several sections, see Fig. 254..
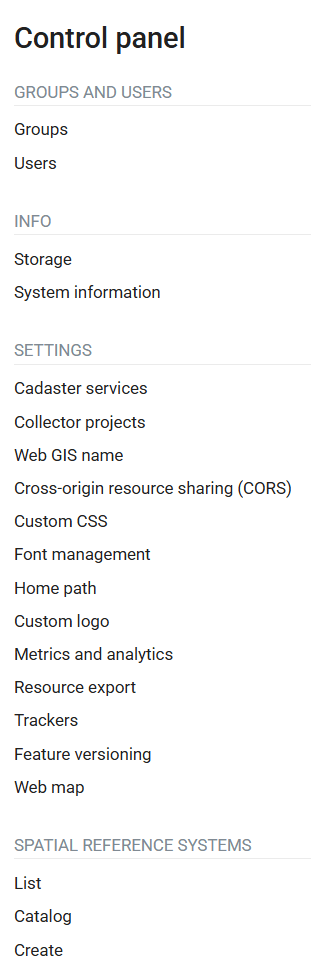
Fig. 254. Control panel#
Control panel allows to execute the following actions:
Access cadaster services
Customize UI elements with White Label module (on-premise only)
For more information about creation of user groups and users and granting permissions see `this section <https://docs.nextgis.com/docs_ngweb/source/users.html`_.
Resource view#
After login to administrative interface the user is taken to home page.
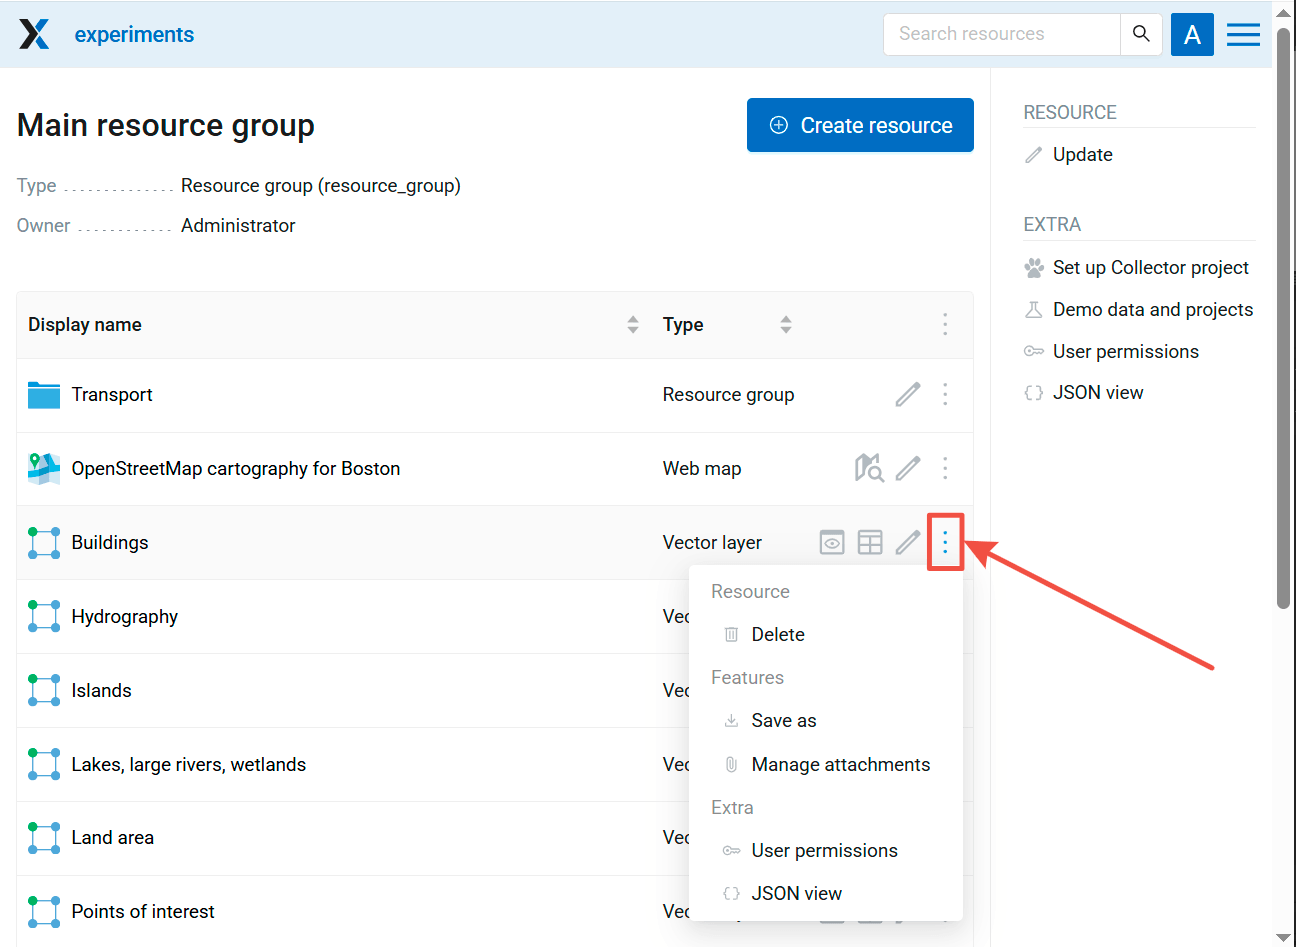
Fig. 255. Resource groups#
The resource list allows users to perform some actions by clicking icons next to the resource name:
 open the resource edit page;
 delete resource;
 view user permissions for the resource;
 open JSON view of the resource.
Other actions can be available depending on the resource type, including:
 preview;
 open (for Web Maps);
 view resource gallery;
 open feature table (for vector layers);
 manage attachments (for vector layers);
 save features of the vector layer as a file, etc.
Press three dots in the right corner of the table title to open the resource list menu.
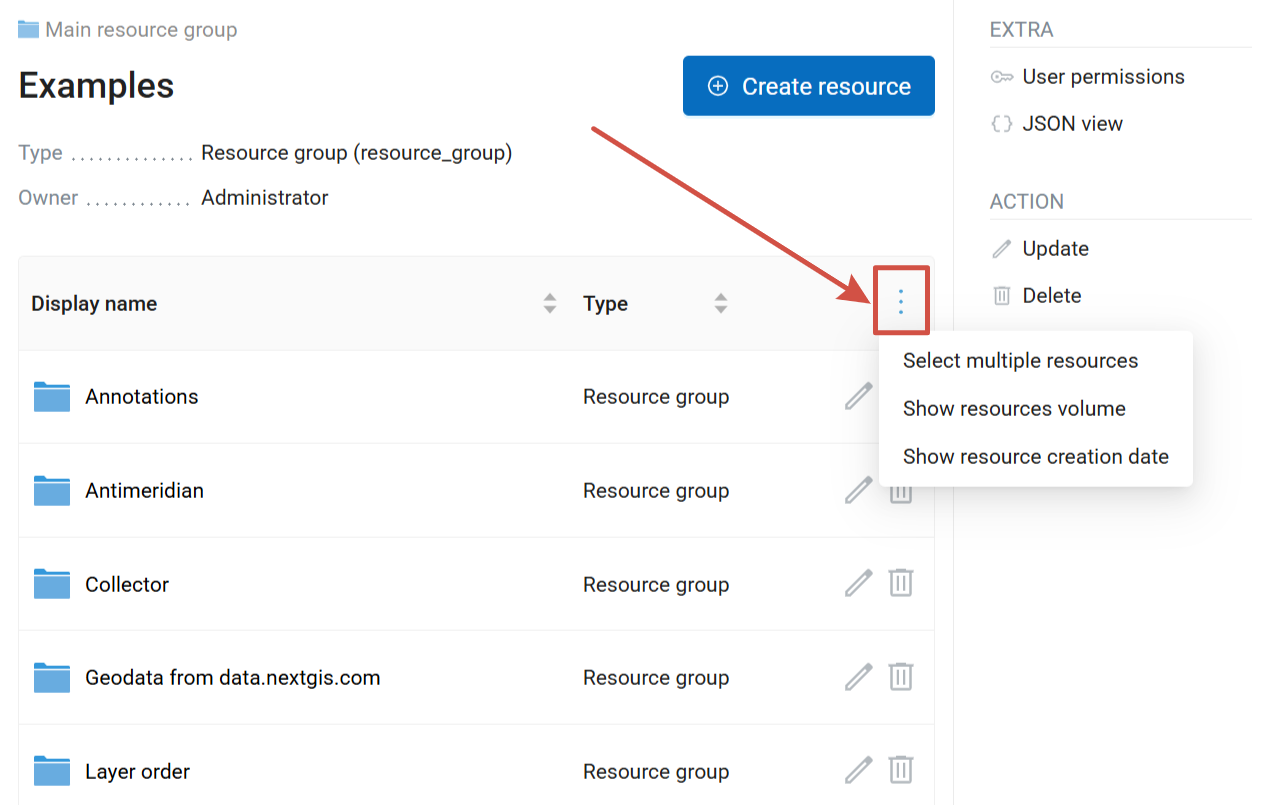
Fig. 256. Resource list menu#
This menu allows to:
View additional columns in the resource list table: creation date and resource volume.
Additional columns allow to sort the resource list by date or size:
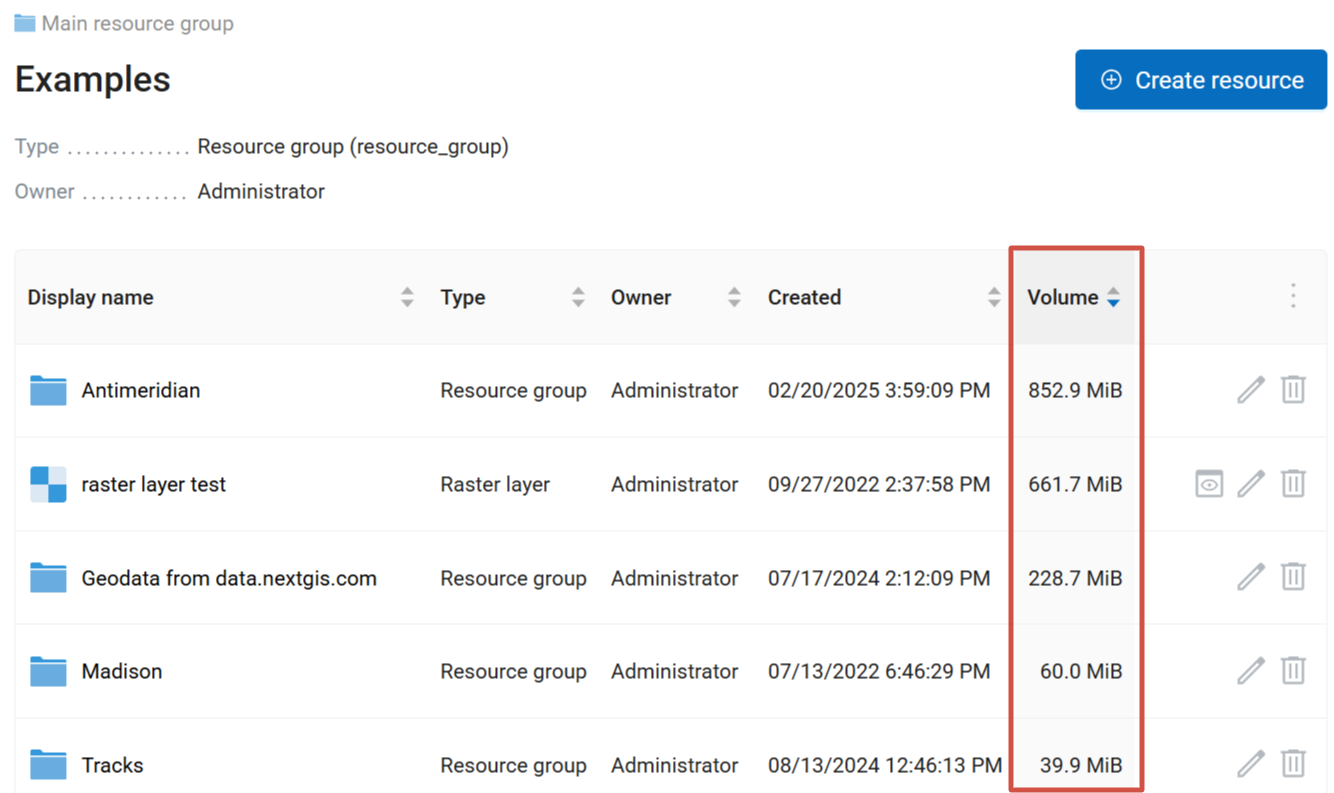
Fig. 257. Resource list sorted by volume#
To open the resource page click on the corresponding row of the table. The resource page contains properties, attributes, a link for external access and a list of child resources if there are any (see Fig. 258.).
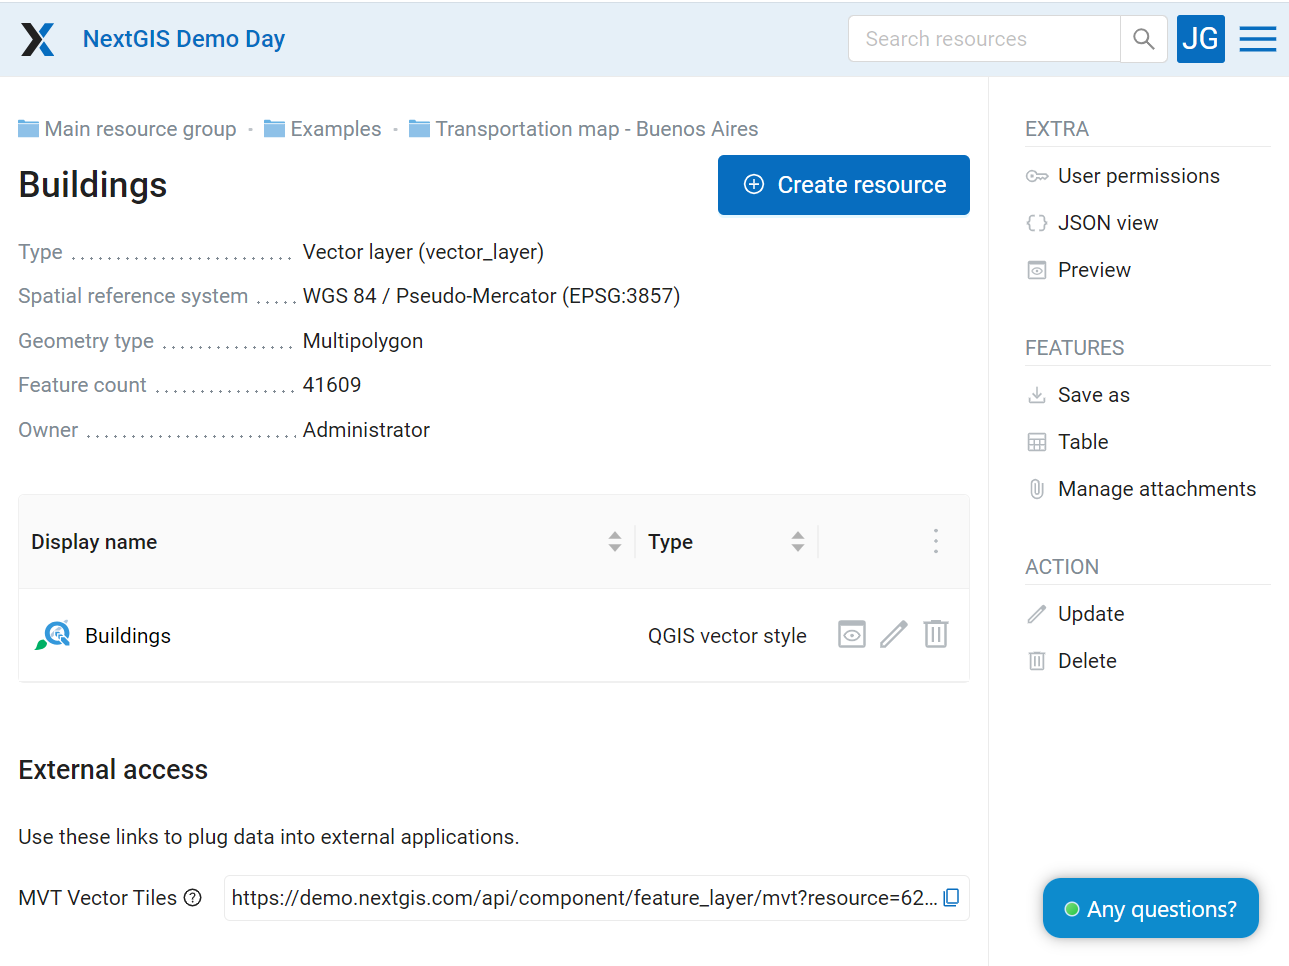
Fig. 258. Vector layer parameters#
Here you can also enter the resource edit mode.
Feature table#
Some resources contain a set of features that can be viewed as a table. Press the “Table” icon opposite the resource name or, if you are on the layer’s resource page, select “Table” in the features pane.
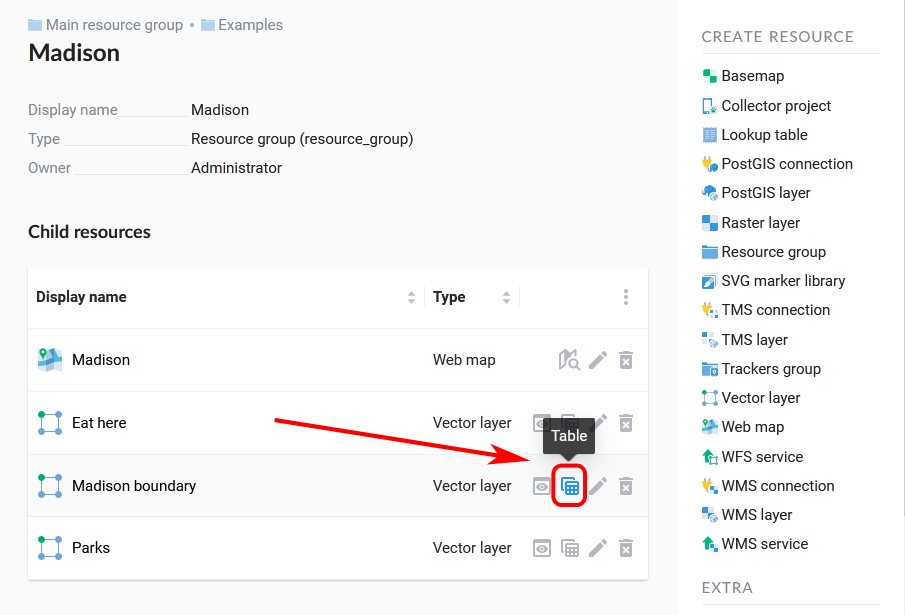
Fig. 259. Opening feature table from the resource list#
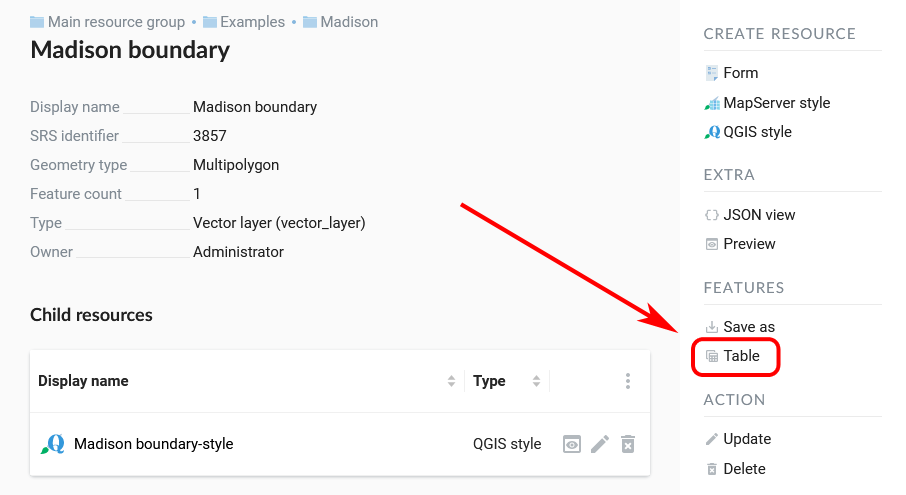
Fig. 260. Opening feature table from the resource page#
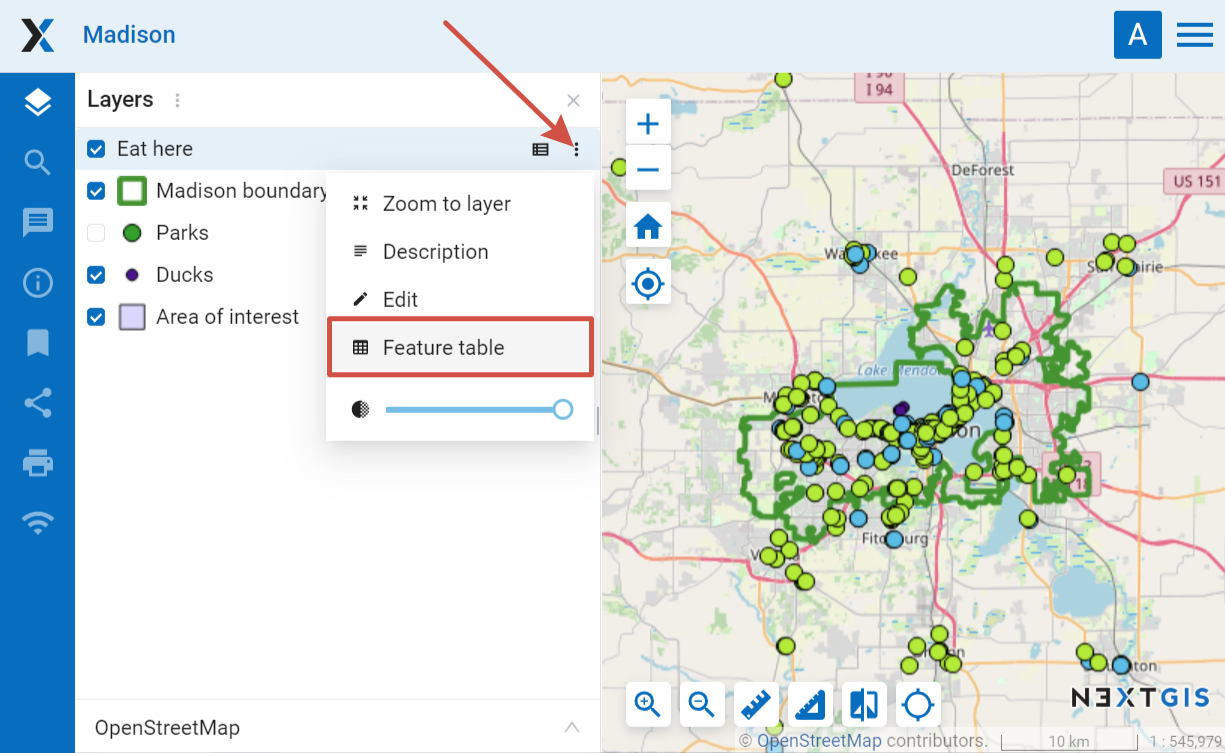
Fig. 261. Opening feature table from the map#
Authorized users can edit features from the feature table.
Data export#
Web GIS allows to export data from Vector layers and PostGIS layer in the following formats:
CSV and CSV for Microsoft Excel
Depending on the format, additional file components are exported making further use of the exported data more convenient. For example CSVT (field structure description) and PRJ (coordinate system description) are added to CSV and CPG (codepage) to ESRI Shapefile.
Note
Geometry and attributes are supported for export. Features’ descriptions, metadata and images can’t be exported in the described way but can be requested using NextGIS API.
To export data, click Save as in the resource menu or, if you are on the layer’s resource page, select “Save as” in the Features pane on the right.
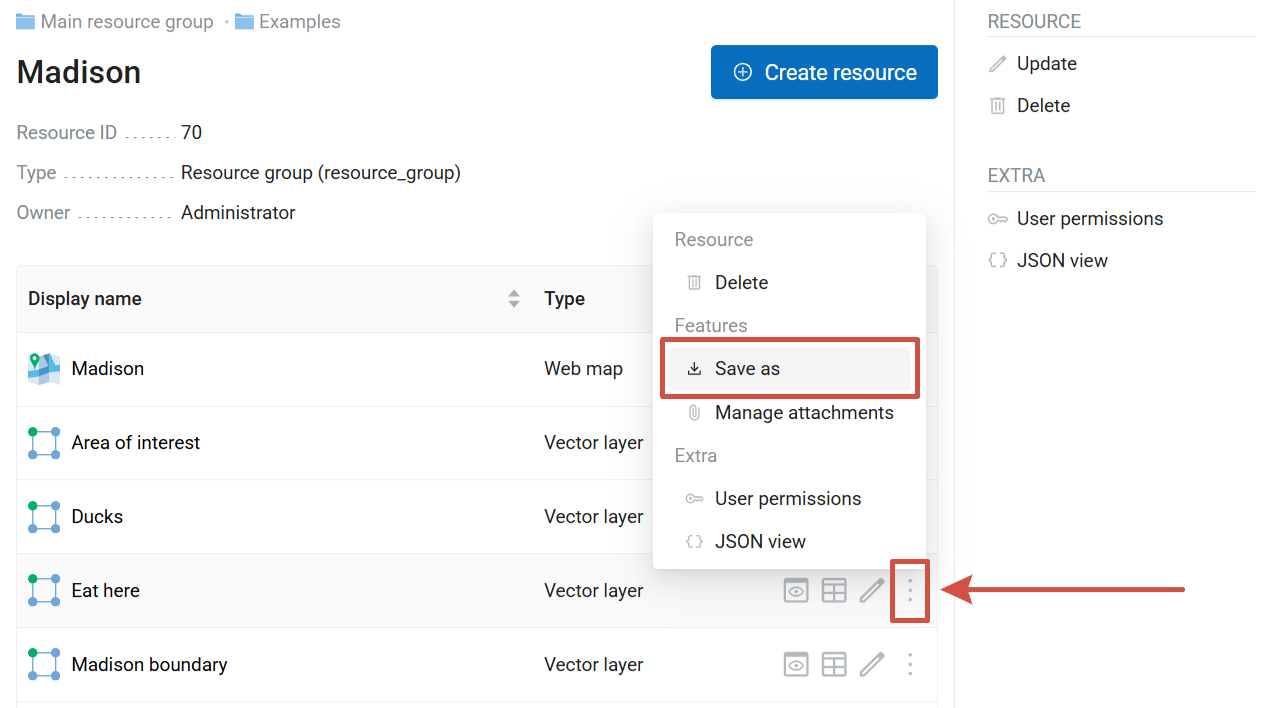
Fig. 262. Selecting “Save as” action to export data#
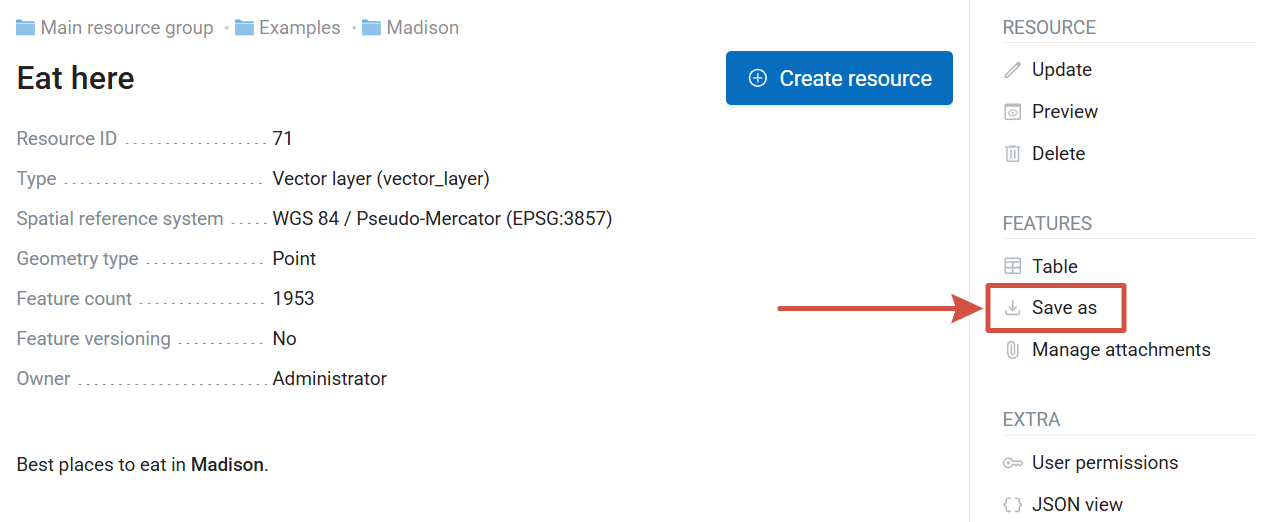
Fig. 263. Selecting “Save as” action on the layer page#
On the next page you can configure the export file. By default data is exported to a GeoPackage file using UTF-8 encoding with all fields included. Learn more about export settings.
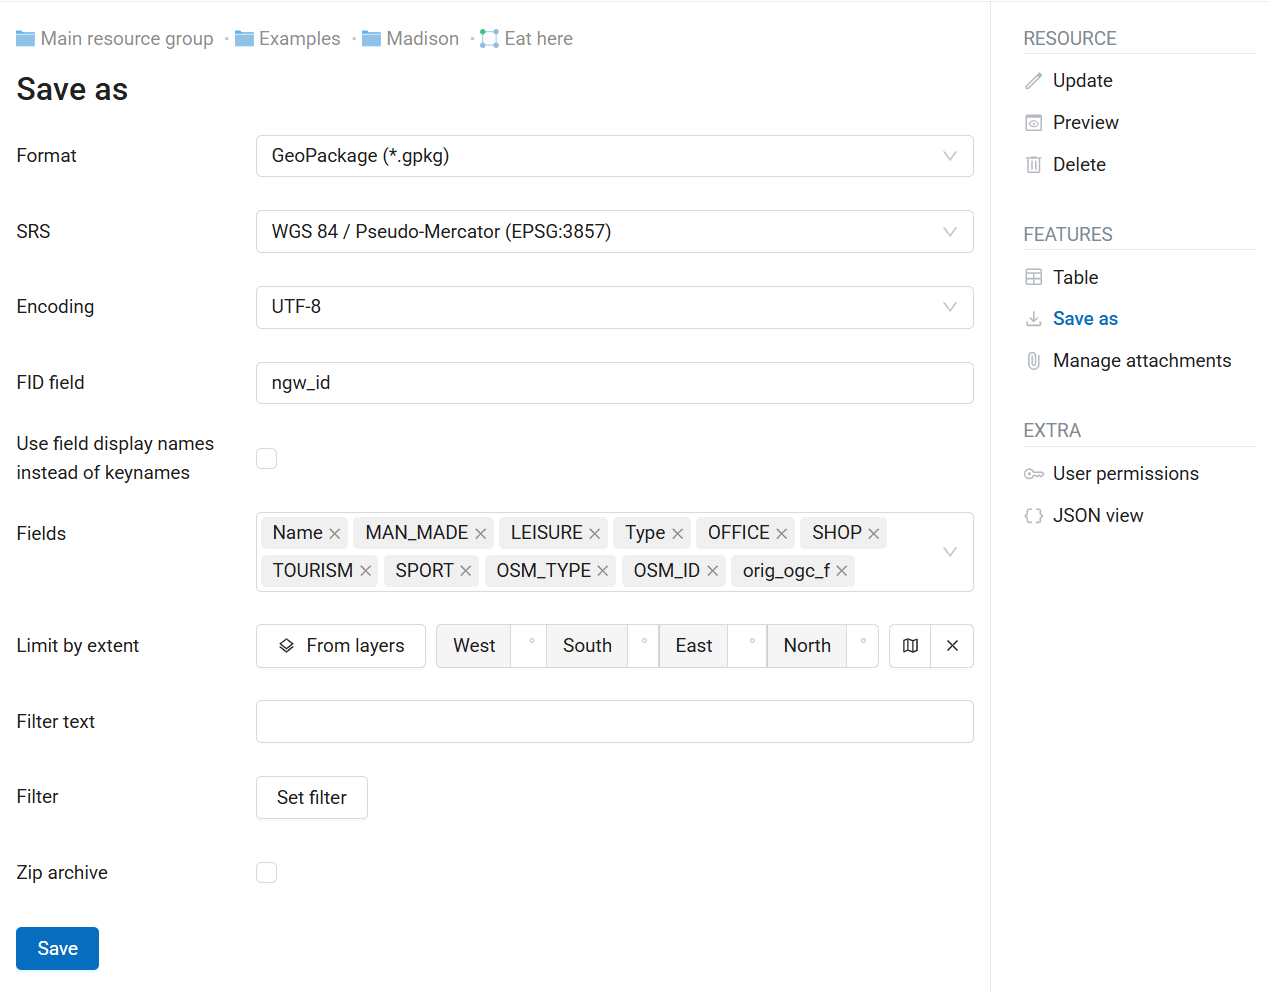
Fig. 264. Data export settings#
Click Save to save the file to your device.
Export settings#
The parameters of the export are:
Data format - GeoPackage as the default, select one of supported formats from the dropdown menu;
Spacial reference system - in addition to standard coordinate systems Longitude-Latitude (EPSG: 4326) and Mercator (EPSG: 3857) you can select custom coordinate systems created earlier (how to add custom SRS see this page);
Encoding - UTF-8, Windows-1251, or Windows-1252;
FID field is used for setting a field name to be added to a exported data where the object identifiers will be placed (the default is “ngw_id”).;
You can choose to Use field display names instead of keynames Keynames are technical and use only plain Latin symbols. Display names can be in any language, usually they are seen as column headers or field labels in a form (for more details see this section).;
Fields - By default, all are selected. To remove a field, click on the cross by its name or untick it in the drop-down menu. To add a field again, tick it in the drop-down menu;
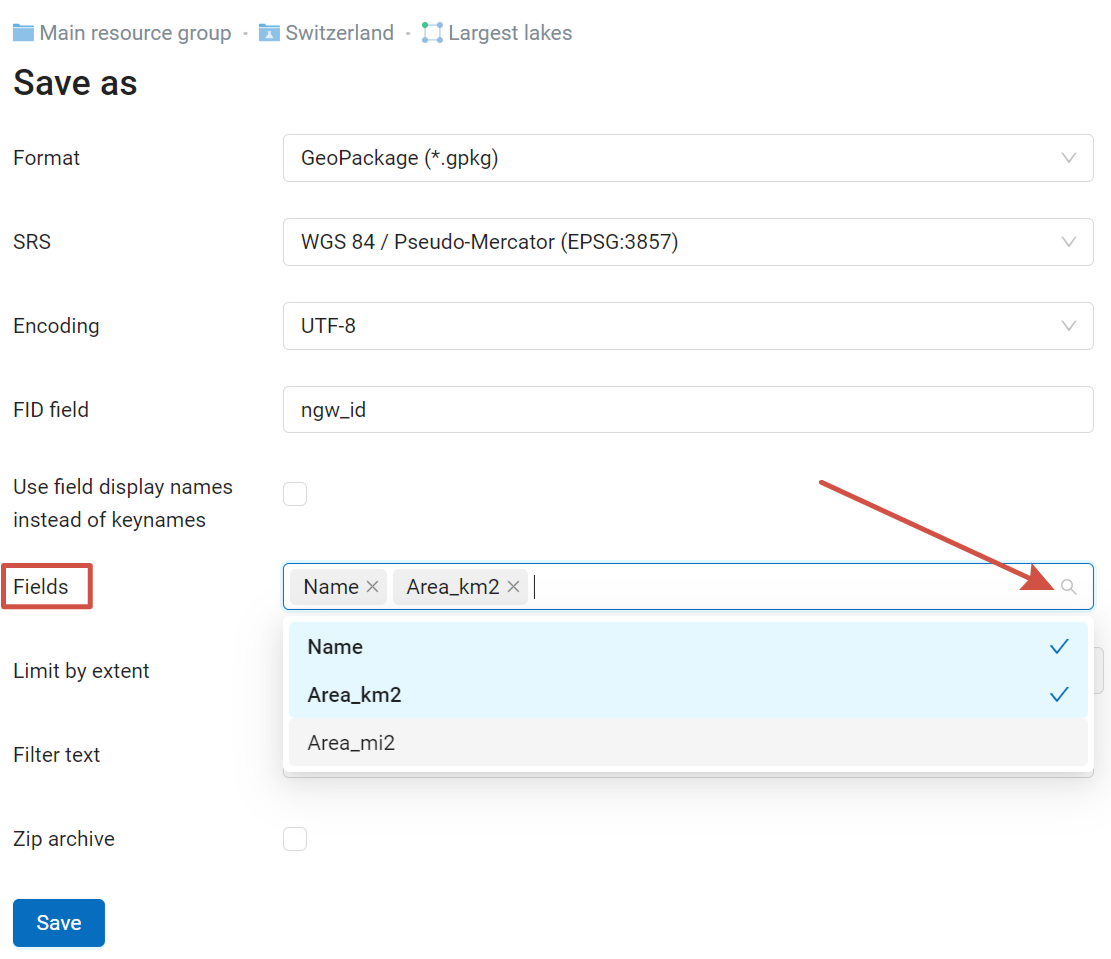
Fig. 265. Selcting fields#
Watch on youtube.
Limit by extent - If you need to export only the features within a particular area. The extent is set in degrees;
Filter text - only export features containing a certain key word. Search is performed in all fields that don’t have text search disabled, just like in the feature table;
Filter - here you can set up more complicated conditions (more on filters);
If you need to have the file archived, select ZIP archive. Output in ESRI Shapefile or MapInfo TAB results in a Zip archive with necessary files. For single-file formats (like GeoJSON or CSV) creation of Zip archive is optional.
All export options are available through HTTP API. For example, this query will get you data in CSV format, EPSG:4326, UTF-8 encoding, zipped:
You can also export data from Vector layers using feature table on the Web Map or with desktop app NextGIS QGIS.
Interface for guests#
User who is not logged in can view resources and resource groups allowed by permissions set for Guests.
On the right there is Sign in button. Click on it to log into the system.
To open the main menu, click in the top right corner. Tree options are available for guests:
Resource - redirects to the main resource group;
Help - link to the web site page containing information about technical support, documentation etc.;
Contact Web GIS administrator - redirects to the account page (you have to log in with your NextGIS ID or create an account). Here you can fill the message form:
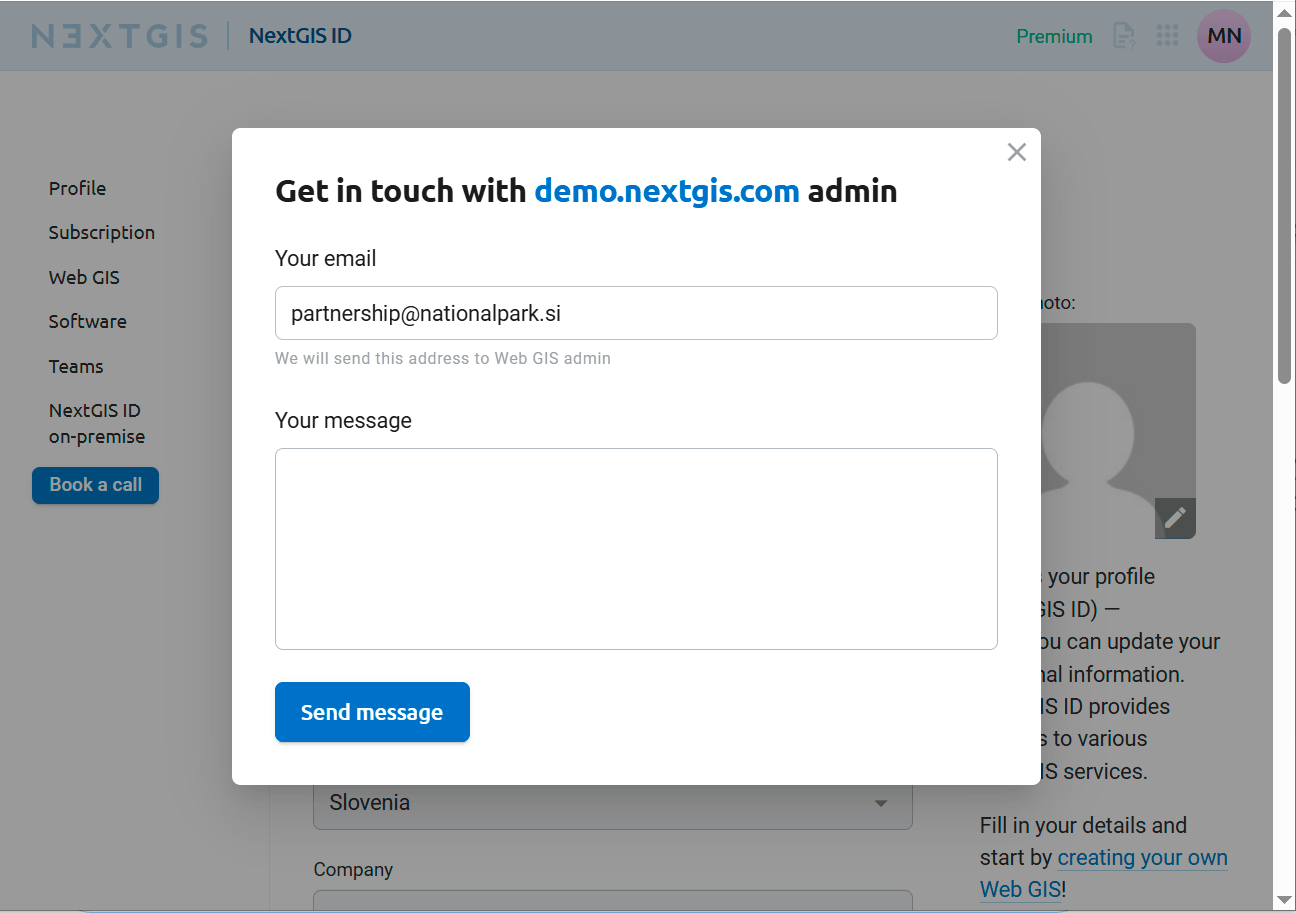
Fig. 266. Message form#
The Web GIS administrator will receive your message and email address so that they can reply by email.