Edit data#
NextGIS Connect plugin allows to quickly edit geometries and attribute values of features in Web GIS Vector layers right after adding them to QGIS. This allows the layer to be edited even with no Internet connection. The changes will be saved to the device and transfered to Web GIS when the connection is restored.
This functionality is only available for vector data formats used in QGIS.
Warning
By default only one user at a time can edit the layer directly.
Import the layer from Web GIS to QGIS by selecting it in NextGIS Connect and pressing
 Add to QGIS.
Enter the edit mode from the layer’s context menu or from the toolbar.
Make the changes.
Exit edit mode. Confirm changes in the pop-up window.
The layer will be automatically synchronized.
To check when the layer was last synchronized, hover over the sync symbol.
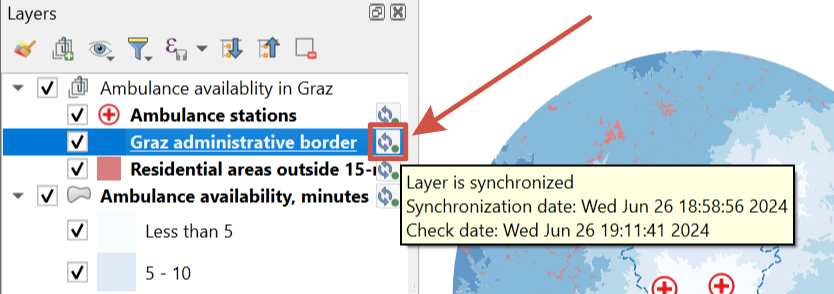
Fig. 865. Synchronization information#
Press the symbol to open the layer status window.
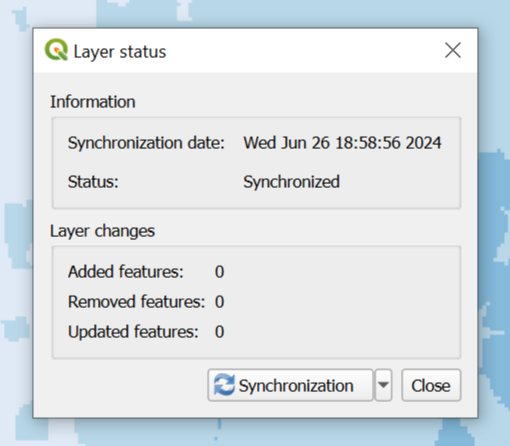
Fig. 866. Layer status dialog#
It has the date and time of the latest synchronization and the status: synchronized or not synchronized.
You can start the process manually by pressing the Synchronization button.
Important
While the layer is in edit mode, synchronization is not available.
If changes have been made to the layer in Web GIS since the last synchronization, further synchronization will not be possible. Reset the layer to make synchronization possible again.
If the edits made in the cloud were incorrect and you need to replace them with local ones, you can use the Data overwrite function.
Only the data itself is synchronized. See how to change the layer structure to keep the synchronization available.
Multi user editing#
Layers can be edited by several people at once or from several different devices/platforms by one or several users. The edits can be made simultaneously or at different times. Here are some common scenarios:
One user edits features in QGIS, on the Web Map and in a mobile app.
Several users edit the same layer in QGIS.
Several users edit the same layer in all possible ways.
If your workflow is close to this, you have two main options:
Enable versioning for the vector layers that are going to be edited. You can turn on versioning in the layer’s settings in Web GIS. When versioning is on, all changes made to the layer are logged in the system. That allows Connect to access edits made on other devices and process them without resetting the layer.
Use OGC API — Features or WFS services. You can create them in Web GIS (WFS, OGC API — Features) or directly in the Connect plugin and then use them to edit data.
If only one user edits the data from the same interface (e.g. from QGIS), you don’t need versioning.
Resolve edit confilcts#
Versioning allows multiple users to edit a layer from different devices at the same time, via QGIS or Web interface. If two users try to make different changes to the same feature, then before saving the changes NextGIS Connect plugin detects an edit conflict and shows a dialog to resolve it.
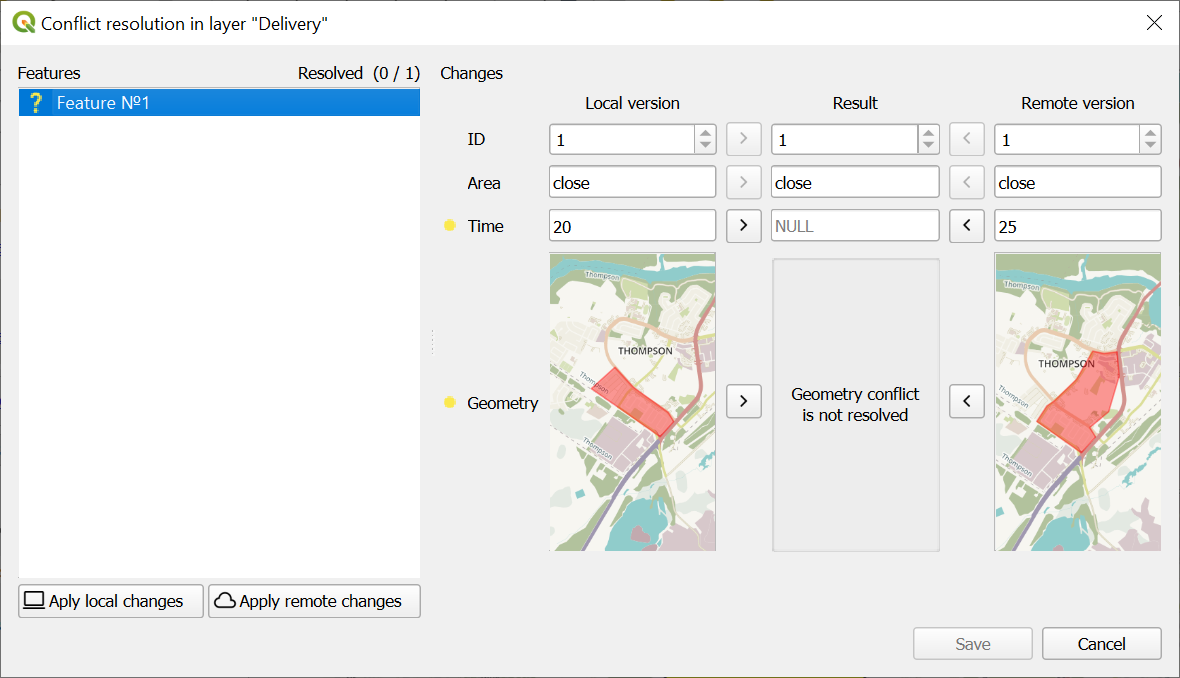
Fig. 867. Edit conflict detected in one feature. Yellow dots mark conflicting changes: in geometry and in one of the attributes#
All the features that have conflicting edits are listed on the left.
For each of the features you can view the attribute values and geometry preview. Conflicting changes are marked by yellow dots. The local changes are shown on the left and the changes saved on the server after you entered the editing mode are shown on the right.
Select the correct option for each conflict individually or apply all the local or server changes at once using buttons in the bottom left corner.
The final version is displayed in the middle, in the Result column. Resolved conflicts are marked by green dots. When all the edit conflicts of a feature are resolved, the question mark next to it changes to a green tick.
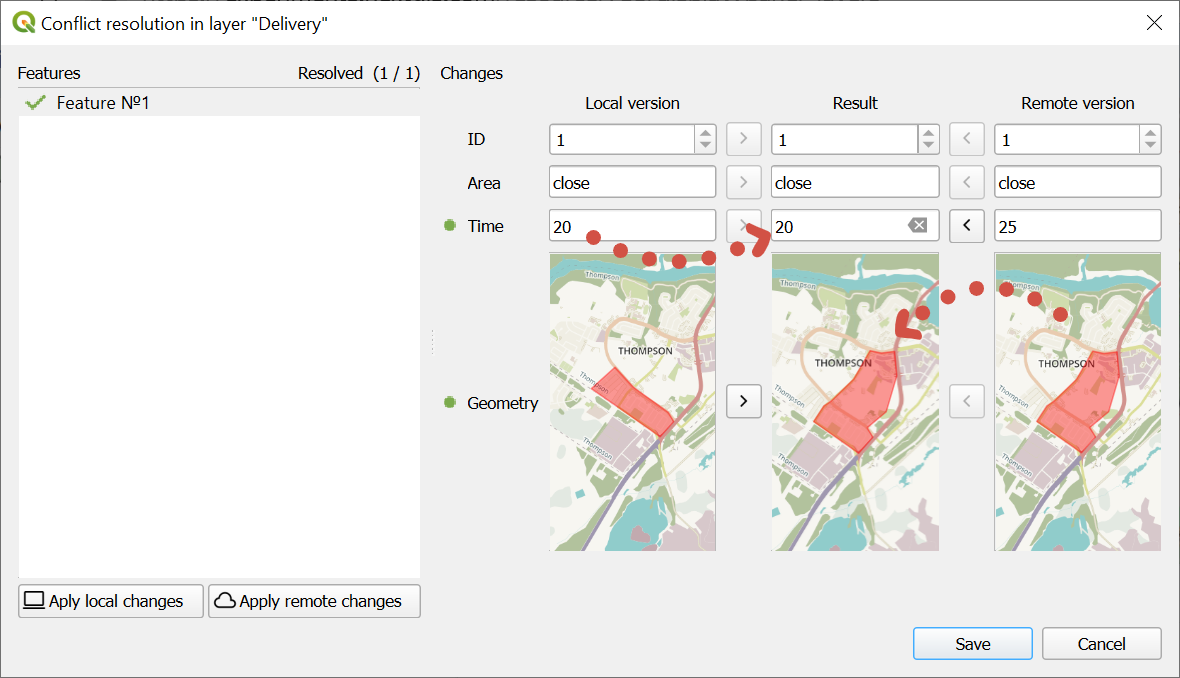
Fig. 868. Edit conflict resolved. As a result, the attribute value is from the local version and the geometry is from the server version#
Change layer structure#
If you want to add/remove fields of a versioned vector layer, added to QGIS from Web GIS cloud storage, make sure to do it this way:
Important! Save all changes made to the layer in QGIS.
Modify the layer structure in Web GIS.
Go to the layer’s sync dialog, click the downward arrow by the “Synchronization” button and in the dropdown menu select Reset layer.
Now you can continue editing the data.
When you add a layer from Web GIS to QGIS, the structure of the layer is stored in the cache. So if you delete the layer from QGIS, you only remove the legen item, but the cache stays intact. When you try to add the layer again after changing its structure in Web GIS, it clashes with the cached structure ending up in error.
Reset layer#
When you reset the layer via sync dialog, you update the cached structure. This way the cached structure matches the one in the cloud allowing you to continue editing and synchronizing the data.
To reset a layer, click on the sync symbol (see ngc-check-sync-pic). “Layer status” window will open. Click the downward arrow by the “Synchronization” button and in the dropdown menu select Reset layer.
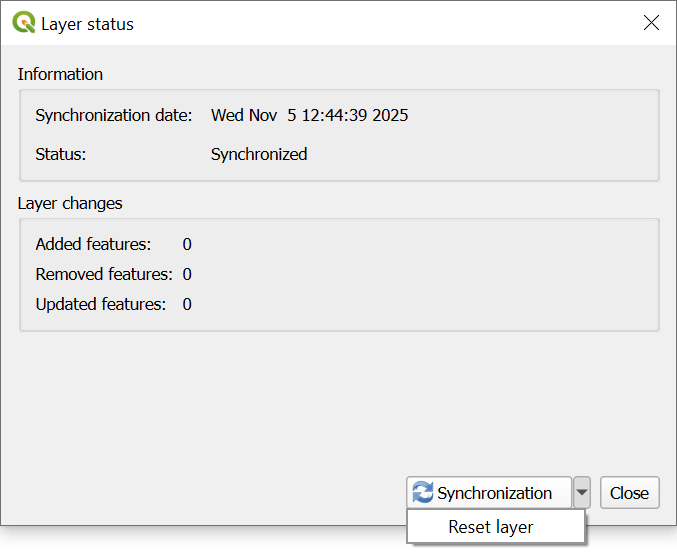
Fig. 869. Reseting layer#
Keep in mind that if you reset the layer, all local changes that had not been synchronized will be lost.
Edit layer with WFS#
You can also edit a vector layer using the standard WFS protocol (with feature edit support):
Publish via WFS protocol the Vector layer you’re going to edit;
Select in NextGIS Connect Resources panel the relevant WFS service;
Press
Add to QGIS button on NextGIS Connect control panel or select Add to QGIS in the service context menu;
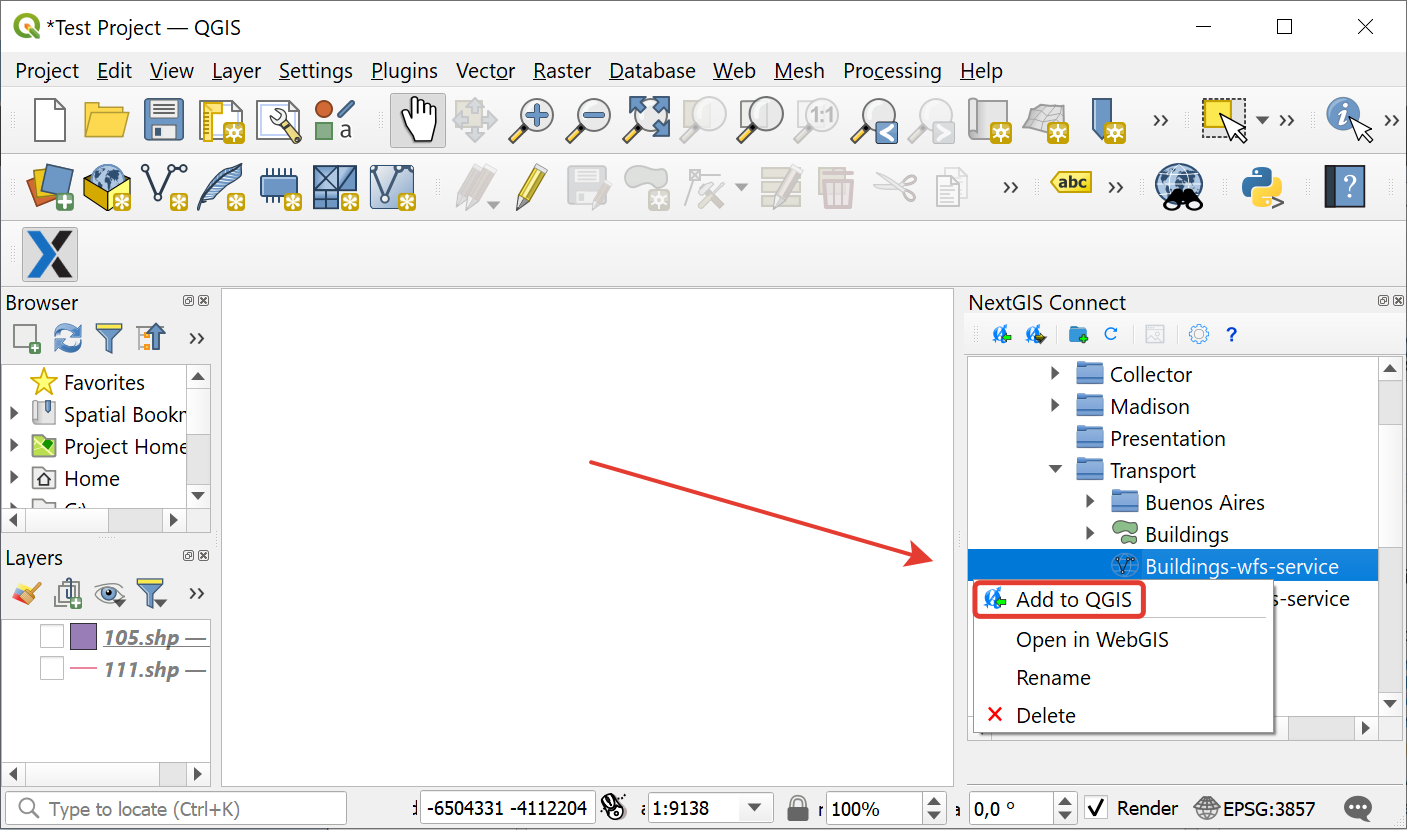
Fig. 870. Adding layer to QGIS using WFS service#
If the operation is successful you’ll see in QGIS Layers panel a new group of WFS layers published via the selected WFS service;
Enter Edit mode and modify geometries and attributes in the added WFS layer using standard QGIS tools;
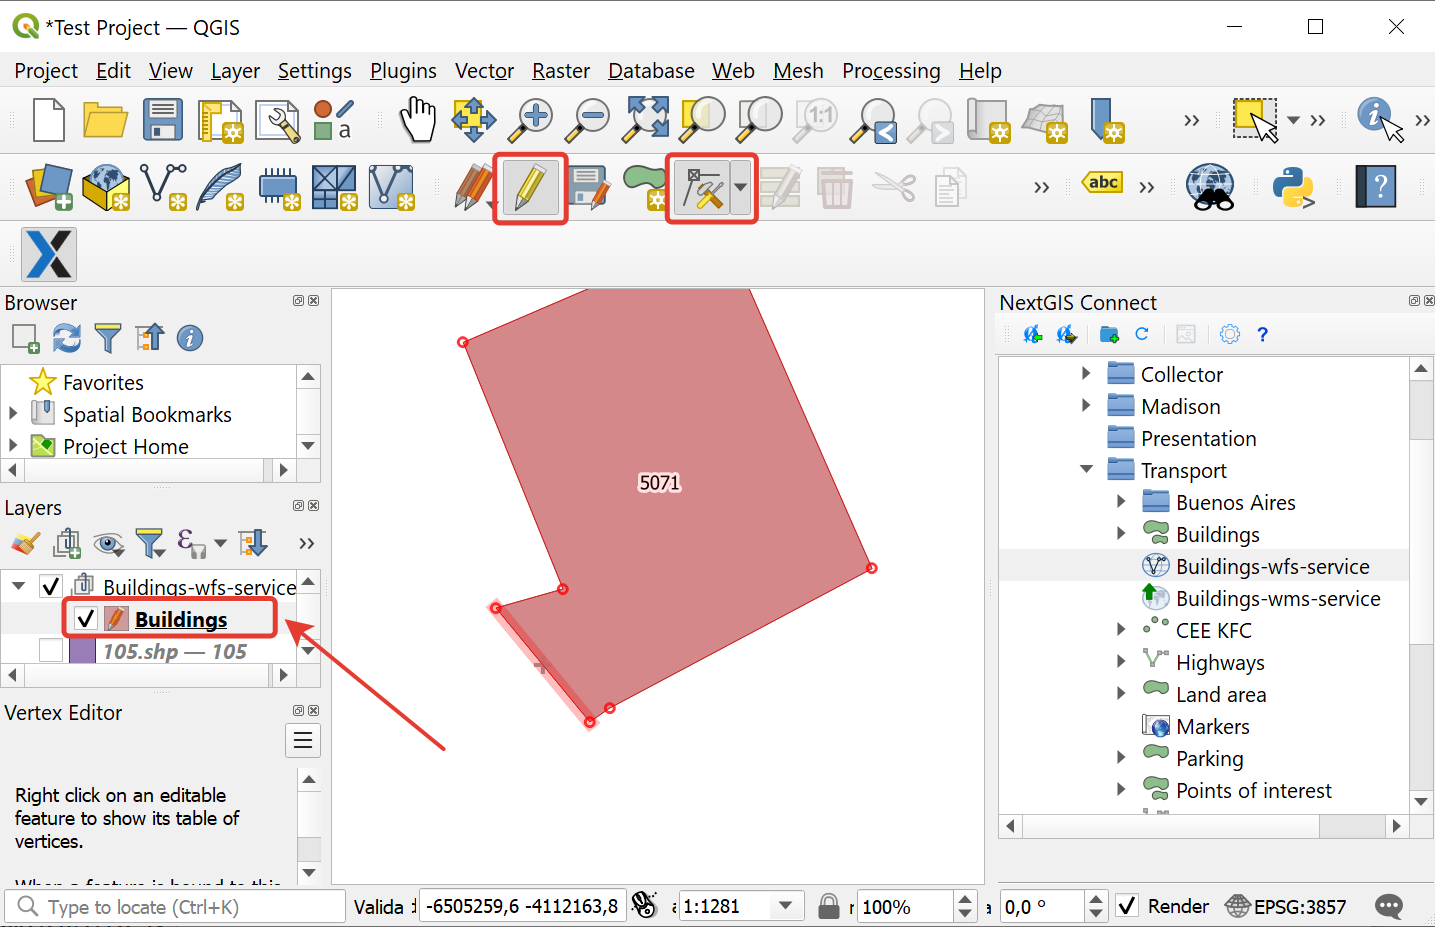
Fig. 871. Features editing#
Press the “Edit” button to finish editing and press “Save” in the opened window.
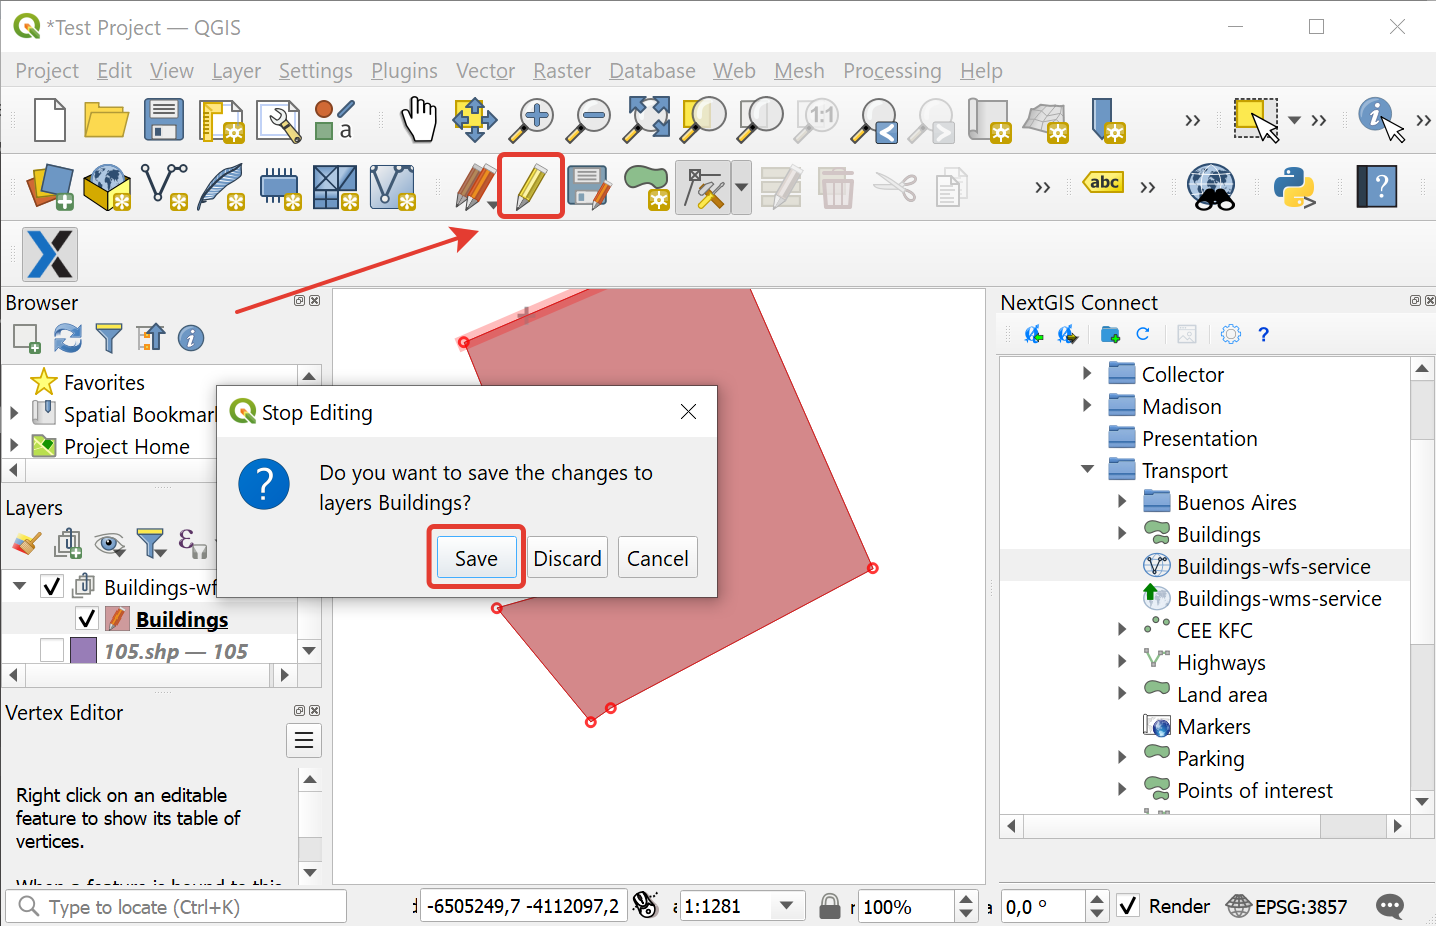
Fig. 872. Saving changes#
If the editing was successful, you’ll be able to see the changes in the Web GIS at once, both in the Feature table and on the Web Map web client.
Update data#
NextGIS Connect allows you to update the content of an existing Web GIS vector layer keeping its styles, attribute aliases and other settings.
Warning
When a layer is updated, all data of the target layer including attachments (photos, documents) is cleared. If you need to keep the attachments intact, use WFS. When you update a style, it does not affect attachments.
To update (overwrite) layer’s data:
In the QGIS Layers panel, select the vector layer that has features you want to send to an existing Web GIS vector layer;
In the NextGIS Connect panel select the vector layer , select the vector layer the contents of which you need to replace;
Right click on the target layer and choose Overwrite selected layer.
Layer resource ID stays the same.
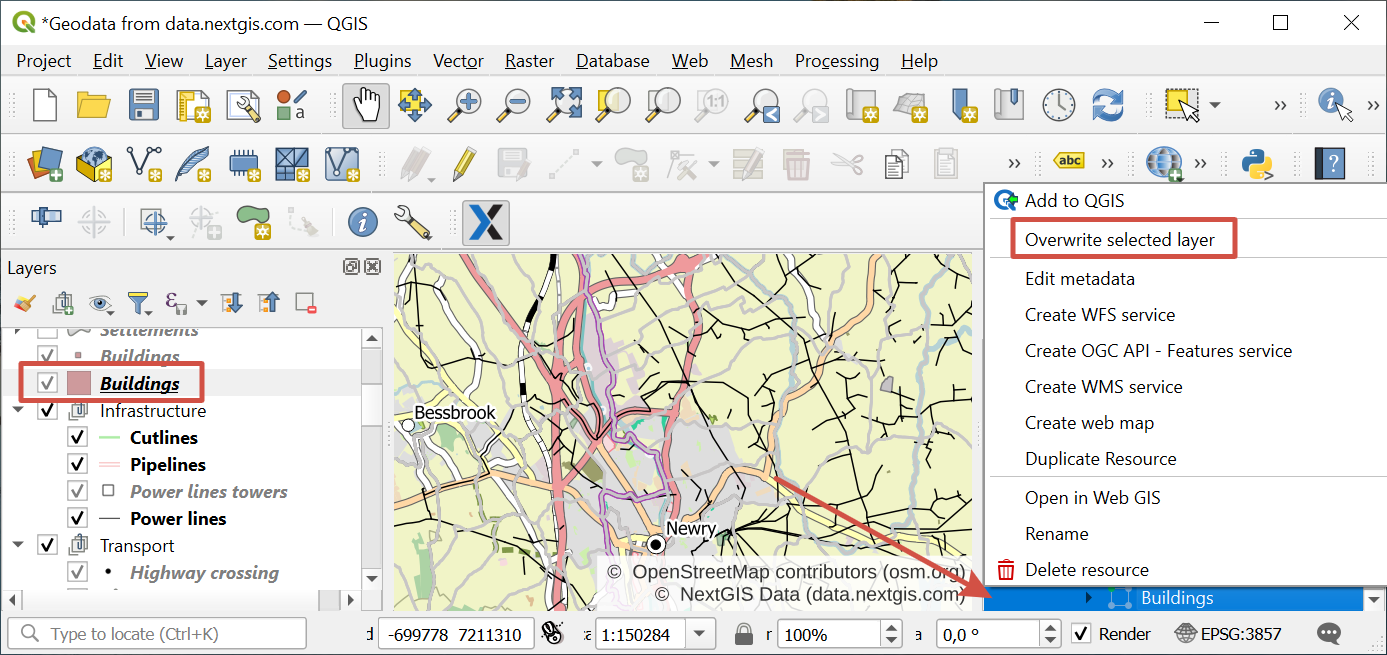
Fig. 873. Overwriting layer with the new version via context menu#
Update style#
You can add another style to a layer or replace its existing style with a new one. When a style is updated, the NextGIS Connect module removes the old style of the layer from the Web GIS and loads the new one leaving all data and attachments intact.
Add layer to QGIS via Connect;
Change the style of the layer (color, line width, etc.);
Select the layer in QGIS Layers panel as well as in the Connect panel.
In Connect toolbar press
 Add to Web GIS and in the dropdown menu select “Add new style to layer” or “Update style”.
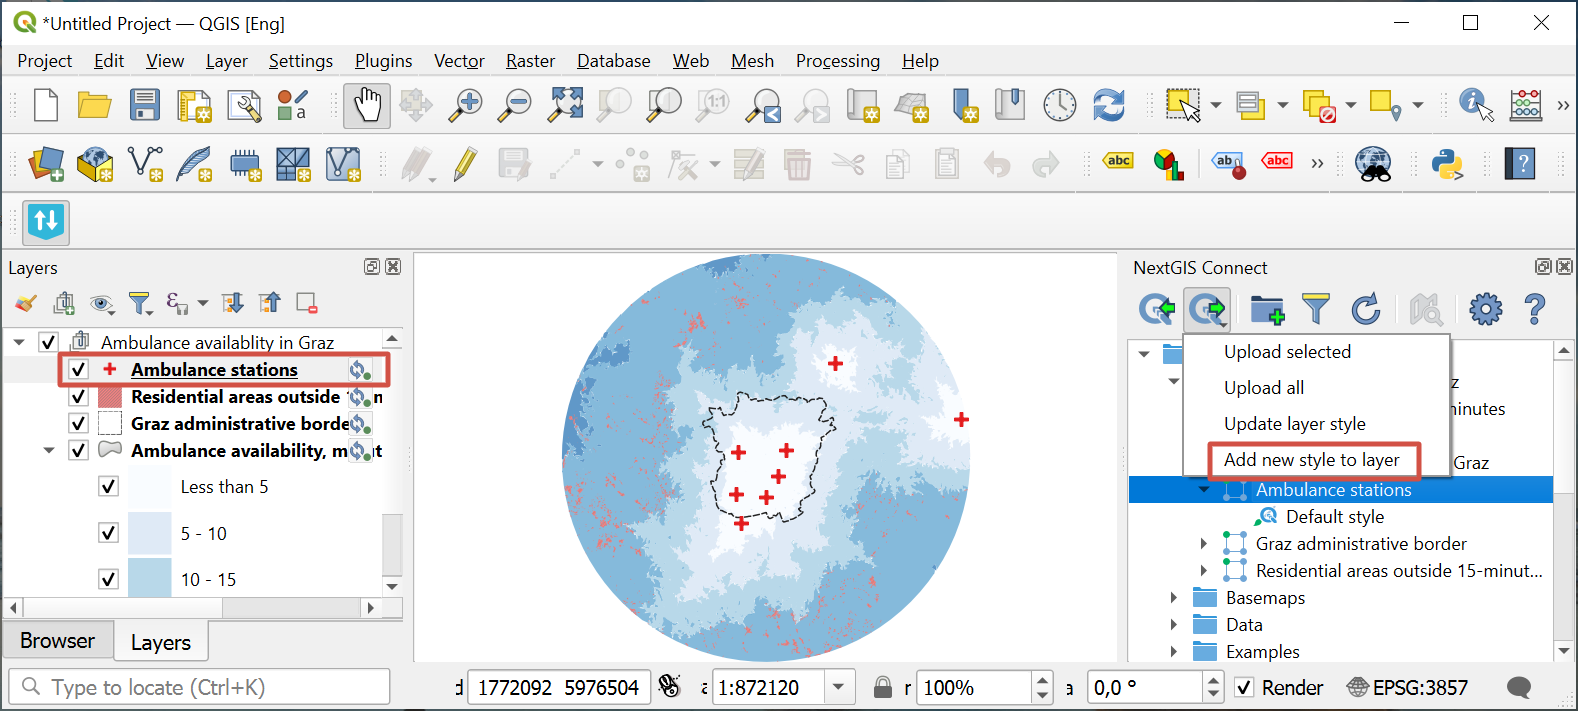
Fig. 874. Adding style to a layer#
To update layer’s style you don’t need to select a specific one.
If the layer has only one style, this style is updated;
If the layer has multiple styles, selection dialog appears;
If the layer has no style, the style is added to it.

Fig. 875. Selecting one of the styles to update#
This operation is also available in the layer’s context menu in QGIS Layers panel: .
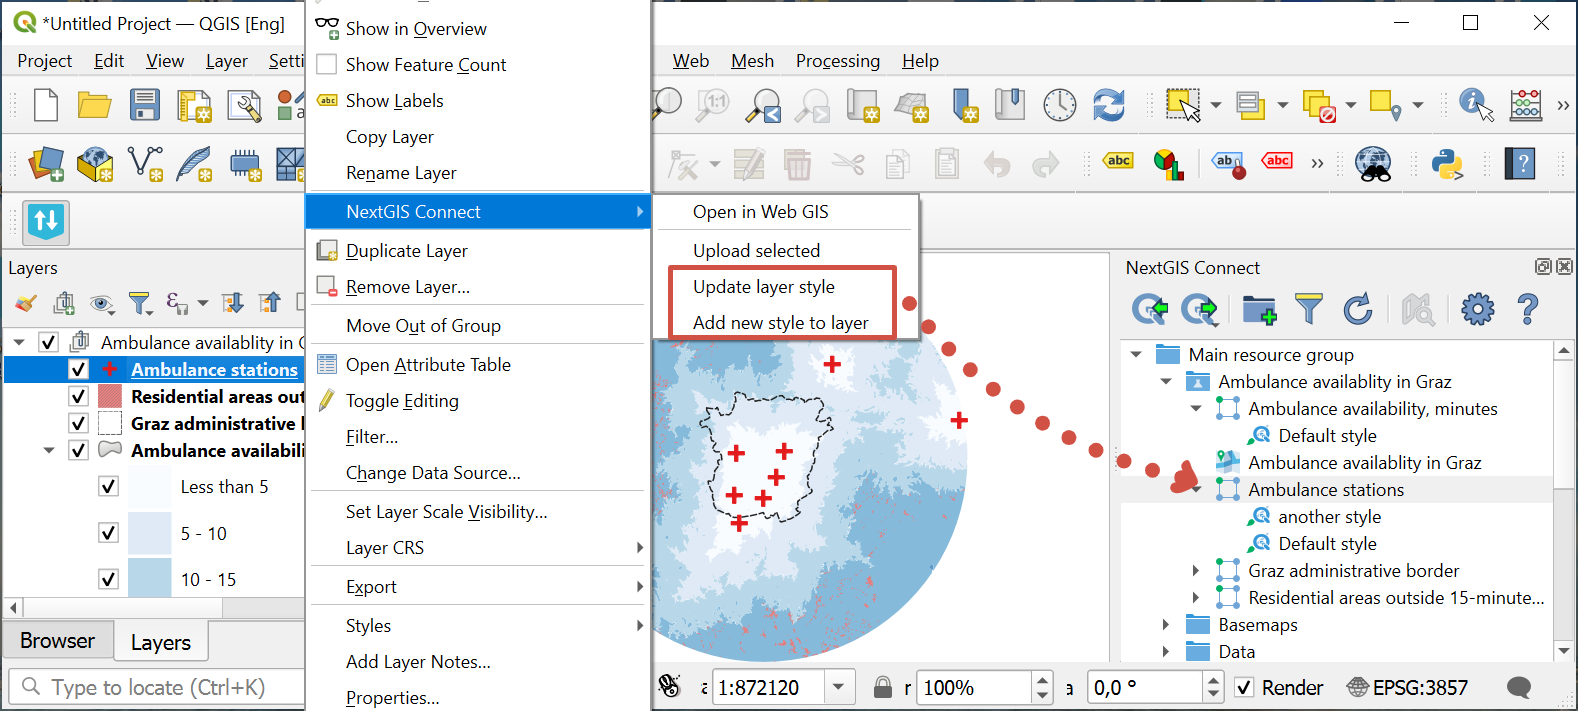
Fig. 876. Updating/adding a style from context menu#
How to keep attachments#
To keep the photos intact while modifying the style, perform the following steps:
Add the layer’s style from Web GIS to QGIS using NextGIS Connect.
Modify the style.
Update the style using NextGIS Connect.

Fig. 877. Updating a style#
Copy style from Web GIS#
With Connect you can copy QML style from Web GIS and apply it to a local style in QGIS.
Watch on youtube.
Click on the layer in the Connect panel to view the styles and right-click on the QML-style. Select “Copy style” in the context menu. Then in the QGIS Layers panel paste style via context menu as usual.
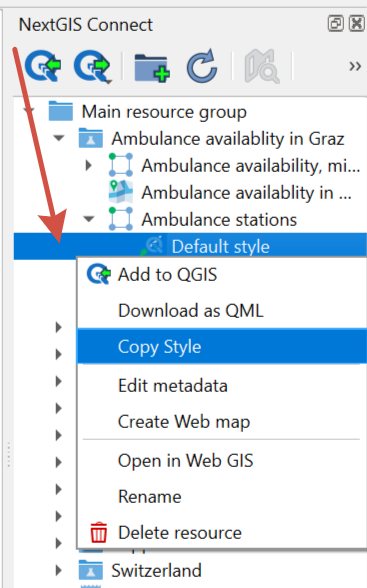
Fig. 878. Copying a style#
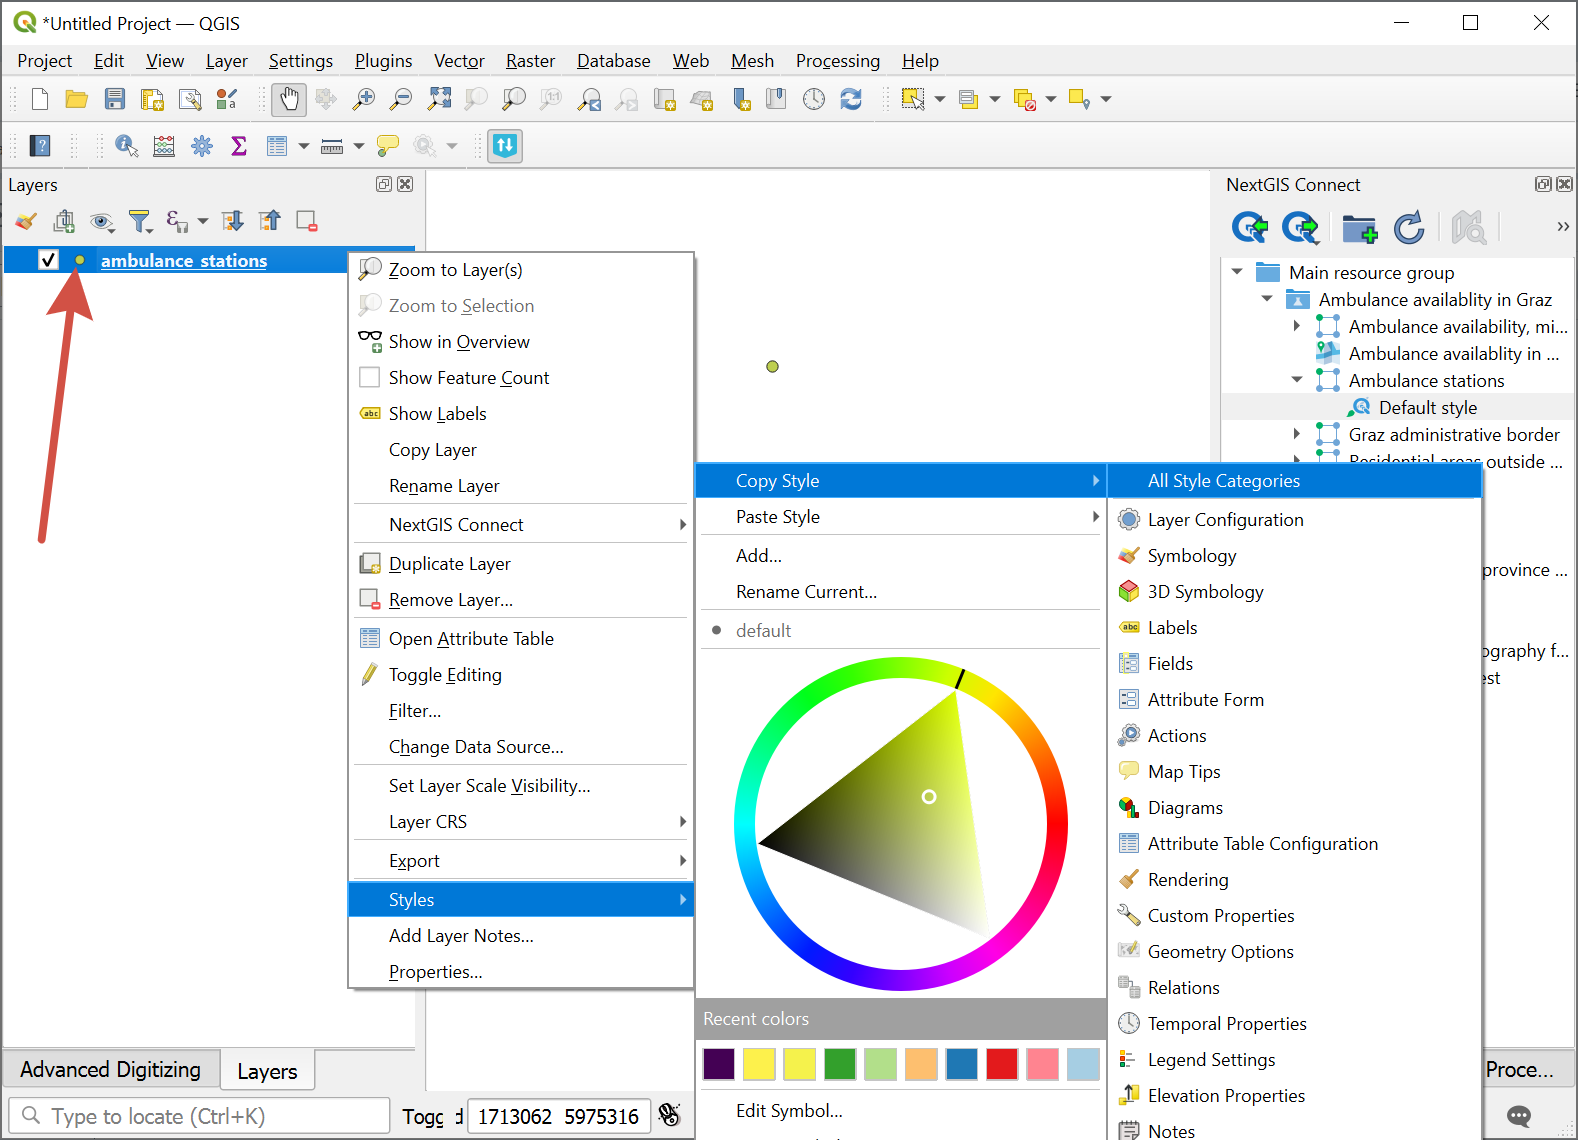
Fig. 879. Pasting a style#
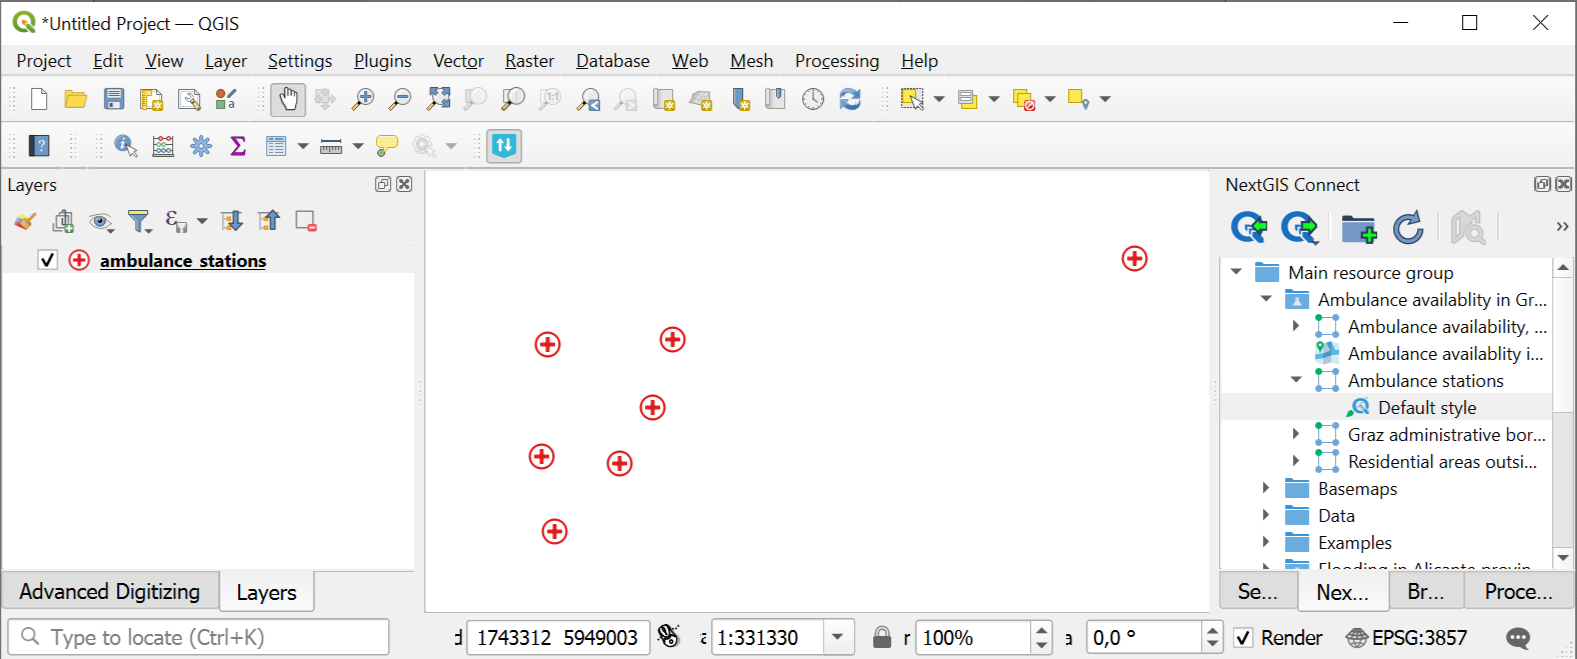
Fig. 880. Copied style in the QGIS project#