13.3. Working with the program
13.3.1. Create a new local form
Run the program. Select File -> New;
Specify the type of geometry for the data to be collected. Select: Edit -> Form Properties and in the opened dialog select the type of geometry needed, then click OK;
Add the necessary elements to the form, arranging them in the desired order. If necessary, follow the additional steps (can be skipped):
choose different aliases for the fields and rename them, pick the necessary types in the “Data” menu.
set the element’s properties in the “Properties” menu;
Save project to file. Select File -> Save and specify the path to the file. In result the file with the .ngfp extension is ready for uploading to NextGIS Mobile and for using it to collect data.
Note
To collect data on your mobile device follow the NextGIS Mobile instructions. After the collection is complete, you can receive the collected data as a separate file. In NextGIS Mobile, select: Main menu -> find the layer in which the data was collected -> action button with a layer (three dots) -> Share -> in the pop-up dialog select the method for obtaining the final file (ZIP archive with GeoJSON data).
13.3.2. Edit local form
Run the program. Select: File -> Open. Specify the path to the file with the .ngfp extension;
Make the necessary changes to the form;
Save project to file. Select: File -> Save. The resulting file with the .ngfp extension can be uploaded to a mobile device as a new layer.
13.3.3. Create a new form in NextGIS Web
Run the program. Create a new project or open an existing one from an .ngfp file;
Set the mode, which automatically creates fields, when elements are created. The button “Bind elements to fields” should be in pressed state;
Add the necessary elements to the form, arranging them in the desired order. If necessary, follow the additional steps (can be skipped):
choose different aliases for the fields and rename them, pick the necessary types in the “Data” menu.
set the element’s properties in the “Properties” menu;
To send ready form to your web GIS, select: Edit -> Upload to NextGIS;
In the dialog that opens, specify the connection parameters and click the “Connect” button:
URL (name) of your web GIS, for example demo.nextgis.com;
select the “guest” checkbox if you want to connect to Web GIS without a login and password. Note: in this case, data collection by using the form may become unavailable - it all depends on the settings of NextGIS Web rights for the guest account;
login;
password.
In the list of resource groups that appear, select a resource group and click the “Select” button. In the dialog that opens after this (see Pic. 13.3.) , check the name of the new layer and the type of the geometry and change them if necessary.
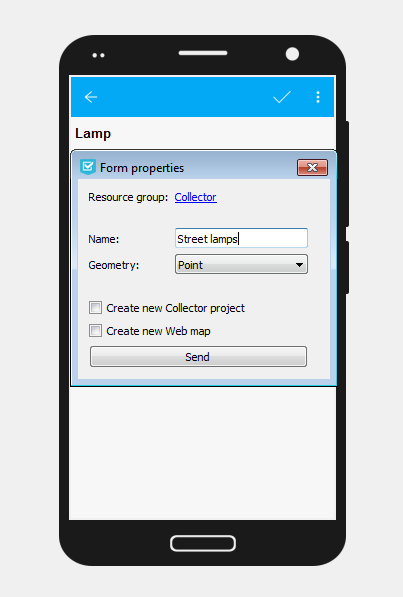
Pic. 13.3. Form properties dialog
In this dialog you can chose what resources to create in the WebGIS. By default, a new vector layer with the field structure, defined in the project, will be created in Web GIS, and the created form will be uploaded to it. You can add this layer as an item to an existing Collector project. In addition to that, you can also create:
a new Collector project (a data collection project and a basemap will be created)
a new Web Map
To do so, tick the corresponding settings in the dialog.
Click the “Send” button.
If it wasn’t possible to create a layer (there is no connection to the Internet, the name of the layer is not unique, etc.), a corresponding message will appear.
If the name of the layer is not unique, you can change it either by selecting Edit -> Form Properties -> Name (by default the name is “Layer”), or when uploading the form to WebGIS.
Note
To collect data on your mobile device follow the instructions of NextGIS Mobile/Collector. The data collected by using the form will be synchronized with the layer automatically.
13.3.4. Create a new form in NextGIS Web for an existing layer
Run the program. Select: Edit -> Download from NextGIS;
In the dialog that opens, specify the connection parameters and click the “Connect” button:
URL (name) of your web GIS, for example demo.nextgis.com;
select the “guest” checkbox if you want to connect to Web GIS without a login and password. Note: in this case, not all layers or resource groups may be visible - it all depends on the settings of NextGIS Web rights for the guest account;
login;
password.
In the resource list that appears, select a resource with the “Vector layer” type and click the “Select” button. If the connection is successful, the data structure of the layer will be uploaded, as well as the existing form (if it already exists for the selected layer);
Make changes to the form. If there is no form initially, but you need to create it for an existing field structure - turn off the automatic field creation mode: the button “Bind elements to fields” should be in unpressed state. Place elements on the form. After that, connect the the fields with these elements through the “Field Layer” property in the “Properties” menu of the element. As a result, in the “Data” menu all fields should have green “ok” markers, indicating that the fields are successfully connected with the elements, and the elements themselves should not have red markers with an exclamation mark.
Upload the modified form to NextGIS Web (see the section “Creating a New Form in NextGIS Web”). Please note that you cannot change existing resources this way; in any case, a new layer will be created and a form will be uploaded to it. If the layer you selected at the beginning had data, then this data will be copied to the new layer if fields match.
See how it works in our video:
Watch on youtube.